
Why Sound Design Matters: Enhancing Your Videos with Effects and Music


When most people think about video production, the first things that come to their mind are the visuals. But sound design is also important-even more so in many cases. A well-produced video with crystal-clear visuals and a properly balanced soundtrack is professional, while a bad audio experience can doom the best video to failure. With CapCut Desktop, creators can easily manage the sound design without having to rely on complicated tools. From incorporating music to utilizing a voice changer, the software enables you to shape your sound to thoroughly resonate in harmony with your image.
Good sound design takes a video and makes it come to life. Whether it's creating tutorials, vlogs, or cinematic edits, the right audio effects and music selections bring depth and emotion. In this tutorial, we will not only let you know the importance of sound but also walk you through a step-by-step guide on how to design sound perfectly in CapCut Desktop.
The Role of Sound in Storytelling
Sound sets the mood, creates the mood, and directly divides the attention of the viewer. Watch a suspenseful scene without a tense background track - it just isn't the same. Similarly, the use of positive music adds more intrigue to social media edits, or by adding slight sound effects to highlight realism in ordinary-seeming footage.
CapCut makes it all a cinch here. It's not just a video editing program; it is an audio quality program that gives you everything from volume control to sophisticated sound effects in one location. This means that you do not have to use different applications to track and balance your sound and video elements.
5 Operational Steps - Enhancing Your Videos With Effects and Music
Step 1: Launch CapCut and Start a New Project
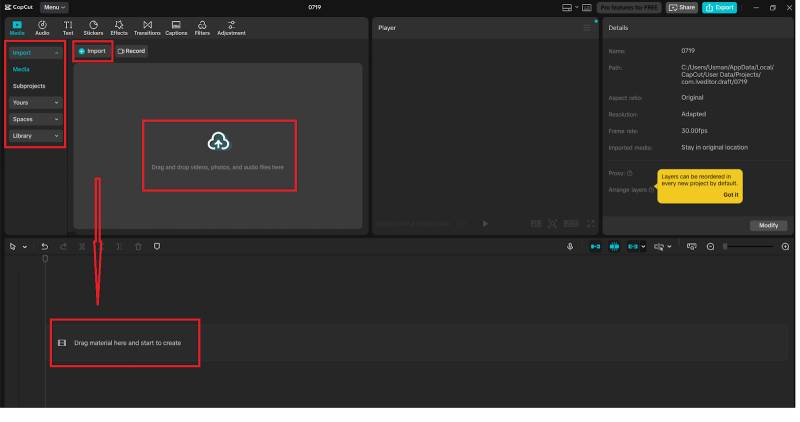
By selecting CapCut Desktop for starting, open it. From the Home screen, click New Project. Browse your video files on the computer and click Open. Your selected clips will be available in the Media panel on the left-hand side.
Now put them into the Timeline to start editing. This allows for the scenario of arranging your audio above the graphics.
Step 2: Import and Add Audio Files
Click the Audio tab along the left toolbar. Then click Add audio to bring in background music or sound effects from your computer. Once transferred, your audio files will show up in the Media panel.
Drag the audio track down under your video clip on the timeline. You'll now see a green audio bar indicating the bar for your soundtrack.

Step 3: Adjust and Edit Audio Levels
You don't want your sound to overpower your images, so with the right click on the audio track of the timeline, you will get Adjust audio. A menu will pop up to decrease or increase the volume
Just like video clips, the edges of your audio can be dragged to trim them. To split it out at the points, select the track and click the Split button (scissor icon). This enables you to sync beats or effects to certain moments in your video.
With CapCut, video editing and sound editing come together into a single workflow - which is why it's not just video editing software.
Step 4: Enhance Audio with Effects and Voice Changer
Sound design also occurs independently of background music. You can add a lot of effects and many options in the voice to make your video lively.
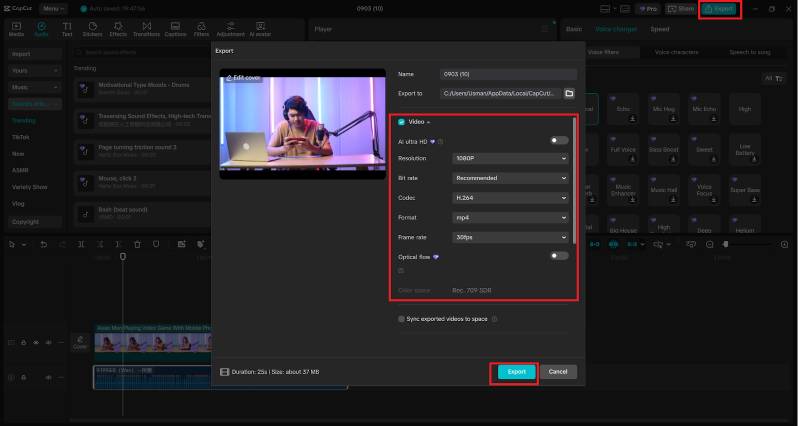
Click on the Audio tab, open the Effects dialog box, where you can browse the sound effects provided by CapCut. Drag whooshes, claps, ambient, or other drag and drop effects to the timeline. Ensuring that each film character alerts you to movements or transitions.
Try using the Voice changer tool if you're planning to speak or if you're planning to talk but don't know how. Choose an audio clip and within an audio adjustment panel, from here select a voice style such as Deep, Echo, or Chipmunk. This can be really useful for gaming montages, creative skits, or storytelling.
Step 5: Export with Balanced Sound
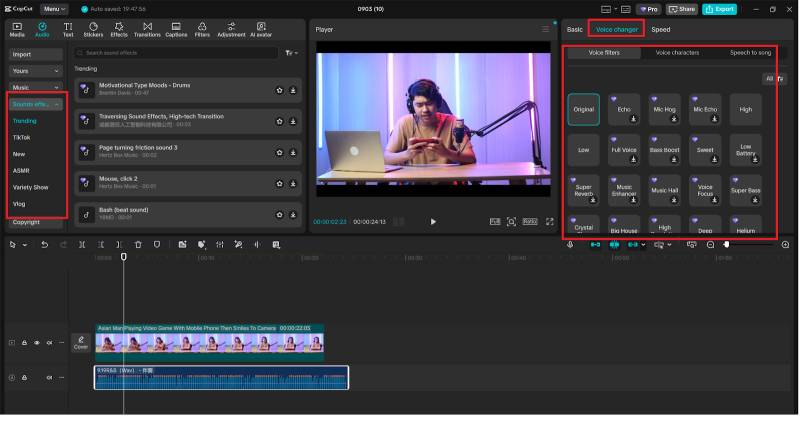
After you've brought your sound design into optimal shape, you can export it. Then click on the Export button located at the top right of the window. In the pop-up window, you can rename your project, select a destination to save the project to, and select export quality.
Once you are happy, play back your project again to make sure the music and the effects sound good when you play the picture. When you have had your fill, click Export again. Your video will be downloaded to your computer with professional sound design.
Combining Music, Effects, and Images
There is visual, and then there is sound design. Using photos with your video, you can import and animate photos quite easily in CapCut. By syncing subtle audio cues to transition between scenes, static images can come alive, as if you were dragging and dropping photos in an online photo editor, with synchronised sound.
This integration of visuals and audio creates the feeling that your final project is smooth, thought-out, and immersive.
Tips for Better Sound Design in CapCut
• Use multiple tracks: Layer background tracks, effects tracks, and narration tracks.
• Match beats to visuals: Edit tracks or transitions out and around the beat of a song.
• Balance audio: When there are background noises, reduce the volume of the background sounds when the voiceover is of great importance.
• Experiment with fades: Utilize fade-in and fade-out options to ensure smooth transitions.
Final Thoughts
Sound design is not just an afterthought-it's the lifeblood of a video. CapCut Desktop's advanced music layer technology, audio effects, and voice changer let you easily craft projects that sound as good as they look.
We hope the process steps above show you how effortless it is to coordinate visuals and sound into a seamless experience! Whether you're an aspiring YouTuber, content creator, or just a casual editor, some audio expertise in CapCut will set your videos apart.